Warbird Information Exchange

DISCLAIMER: The views expressed on this site are the responsibility of the poster and do not reflect the views of the management.
It is currently Thu Apr 18, 2024 8:22 pm

All times are UTC - 5 hours


Classic Wings Magazine WWII Naval Aviation Research Pacific Luftwaffe Resource Center
When Hollywood Ruled The Skies - Volumes 1 through 4 by Bruce Oriss


Post new topic Reply to topic  [ 7 posts ] 
Author Message
 Post subject: The Twin Mustang thread
PostPosted: Mon Mar 10, 2014 12:27 pm 
Offline
User avatar

Joined: Sun Aug 06, 2006 7:14 pm
Posts: 466
Location: Cincinnati, OH, USA
I've been working on another Fritz the Fox animated cartoon. (If you've never heard of Fritz, you may enjoy his aerial hijinks...follow the link in my signature for a look) This cartoon is a bit of a tribute to creature features of the fifties, so it seemed only natural that it should include one cheesy miniature shot. Fritz's mount in this particular toon is a Twin Mustang of the Alaskan Air Command. In order to make the shot work, I had to come up with a couple of F-82's that I could somehow motorize and crash into an arctic diorama, all within the confines of a budget and amount of space that would not provoke objections from my saner half.

I thought you guys might enjoy a build thread...

Image

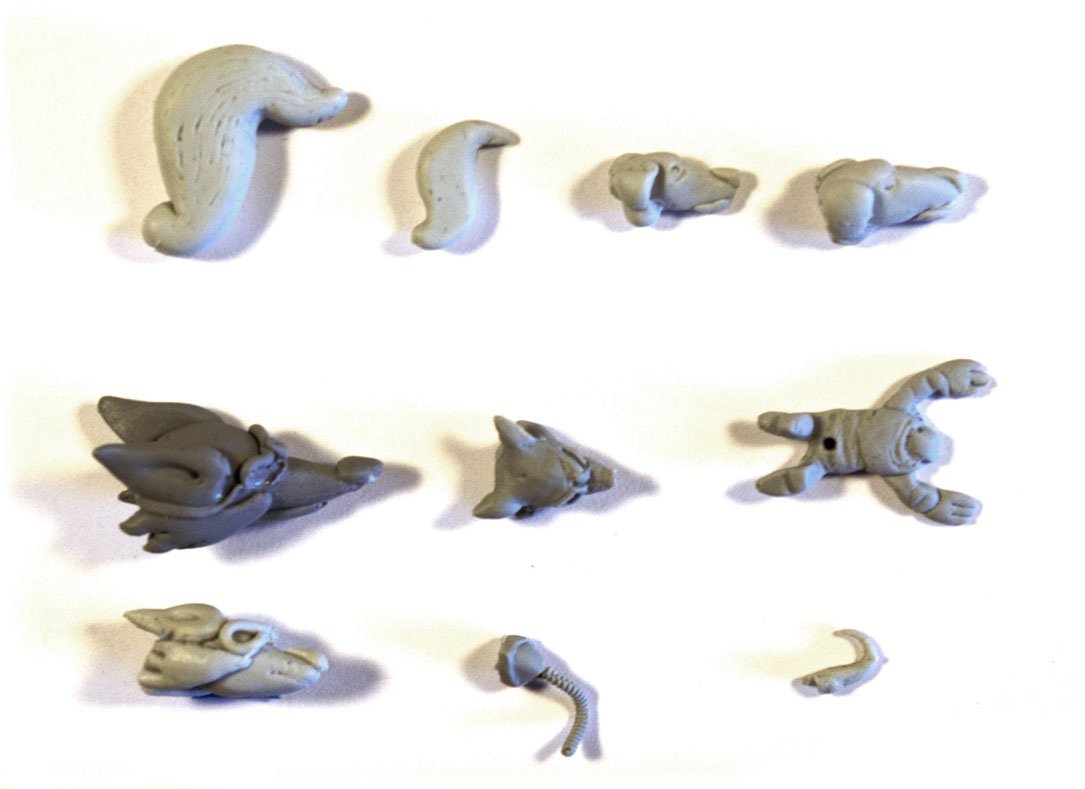
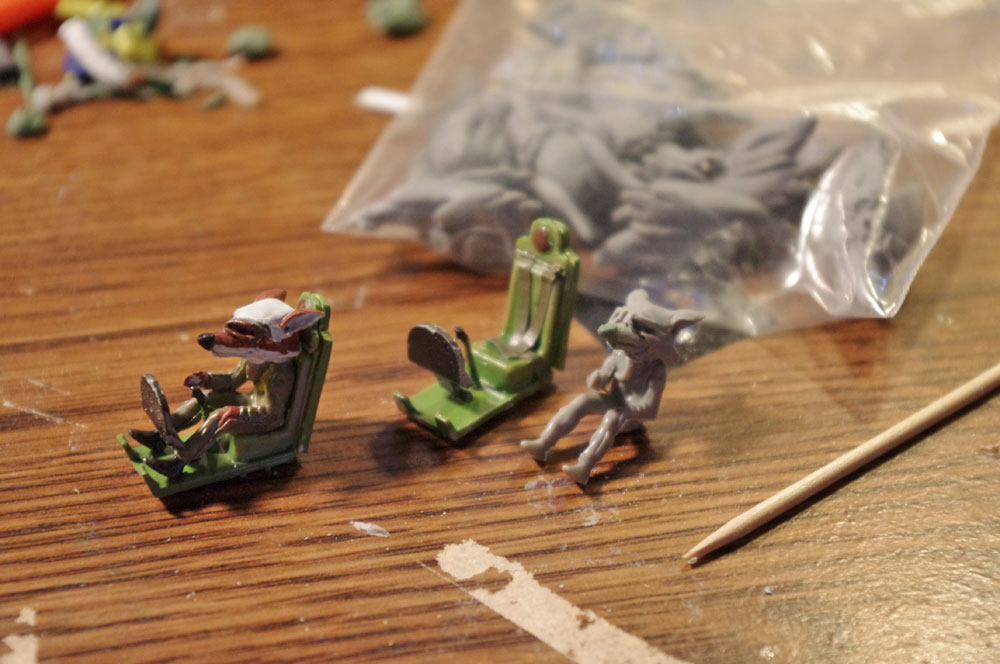
The first and foremost challenge was how to model Fritz himself. Most model kits don't include an anthropomorphic Fox that you can put in the pilot seat. Fortunately, I have some friends at Ironwind Metals (formally Ral Partha). They were able to help me mold a 1/72nd scale Fritz the Fox head that I could stick on a pilot figure. I liked the result so much that I had Fritz and his sidekick, Hans, cast in several scales (which I will soon offer as a resin kit for sale on my site). It turns out the biggest expense is the sculptor, so after seeing how it was done, I sculpted Fritz myself. Before I knew it, I had boxes full of resin Fritz parts! Here's a 1/72nd scale Fritz being assembled for themodel. You can see one assembled cockpit with Fritz, and another Fritz awaiting painting. The bag in the background contains the first batch of resin 1/32nd scale heads. Sadly, they had a defect, but the mold is being repaired and the next batch should be ready soon, along with masters of the new pieces. The small heads had a tiny bubble in the nose, as well, which is why the unpainted Fritz has a green nose. I had to sculpt a replacement.

Image


For the aircraft, I chose Monogram's (Revell's) venerable F-82 kit. The challenge with this model is its small size. The only other option was the much-maligned Modelcraft 1/48th scale kit, but it is hard to find, harder to build and harder still to make pretty, so I stuck with the classic. This photo shows the finished cockpits and motors being test fitted. The motors are the smallest ones I could find, from an RC Quadrocopter. They will be powered by a small cell battery in the wing center section, which can be accessed via the plane's ammunition panel. It won't fly, but the motors are adequate to spin the props at several thousand rpm, which will be necessary to get a good prop blur when shooting video at a hundred frames per second.

Image


Fritz's airplane(s) in the paint shop...next up is a bit of weathering and then applying the bare-metal foil for an authentic aluminum finish.

Image

Beginning to apply the bare-metal foil to Fritz's plane...painstaking work, but it couldn't be shinier. The Carson visor in the background has made the task more bearable...I highly recommend one to anyone who does a lot of detail work. There are four different power of lenses you can swap out, and the LED light can be repositioned or even removed and placed wherever.

Image

Sometimes I foil the plane, and sometimes it foils me. The compound curves of the fuselage can be a real challenge. When in doubt, I follow the paneling of the real aircraft. Odds are, if the engineers couldn't get the real aluminum panels to bend that way, then I'm not gonna have much better luck with foil. See the incompletely foiled fuselage in the photo? There are over a dozen pieces of foil on the port side alone. I invented a few new curse words while trying to put the paw print on the tail of the other fuselage, too. Slow going, but it is exciting to see it take shape.

Image

Here's one of the completely foiled planes ready for clearing, decals and weathering. The prop hubs have been installed. This was more challenging than it sounds, since the model's props were not designed to fit on the tiny shaft of the electric motors. I had to cut some 4mm long bits of tiny brass tubing and glue them inside the hub, then somehow mount them to the shaft. My initial effort to glue it on the shaft nearly wrecked one of the engines...a small disaster, given that the motors were now glued inside the fuselage...as the glue ran down the shaft and seized up the engine. Fortunately, I was able to clean it off and try again. The second time around, I used tire balancing putty, which is both very sticky and very likely to stay where you put it. It worked great!

Image

Note the discolored foil around the exhaust stacks: I boiled some aluminum foil with egg shells for about twenty minutes to yield the oxidized metal look, then cut and pasted them on with micro-scales foil glue (which also serves double-duty as a decent canopy glue). I must've cut a dozen of them just to get four good pieces. The ammunition access panel was slightly weathered by painting it with bleach, which took the shine off of it a bit. I'll save the rest of the weathering for after I apply the decals.

I'm waiting for some spray-on acrylic varnish in the mail so I can put on the custom decals. Since the plane must match the one in the cartoon, I obviously cannot use all of the kit decals, so I will be printing my own. Stay tuned to see how that goes...

_________________
What is red, furry and on your six?
Image


Top
 Profile  
 
PostPosted: Tue Mar 11, 2014 10:32 am 
Offline
Long Time Member
Long Time Member
User avatar

Joined: Wed Jan 24, 2007 1:54 am
Posts: 5120
Location: Stratford, CT.
So Cool! I really appreciated your explanation too of everything. A whole lot of work going into a shoot but hey… thats what you have to do it. Make sure to include filming production shots too!

_________________
Keep Em' Flying,
Christopher Soltis

Dedicated to the preservation and education of The Sikorsky Memorial Airport

CASC Blog Page: http://ctair-space.blogspot.com/
Warbird Wear: https://www.redbubble.com/people/warbirdwear/shop

Chicks Dig Warbirds.......right?


Top
 Profile  
 
PostPosted: Sat Mar 22, 2014 1:35 pm 
Offline
User avatar

Joined: Sun Aug 06, 2006 7:14 pm
Posts: 466
Location: Cincinnati, OH, USA
Just a brief update: I finished foiling the second aircraft (I'm making two, since something bad could conceivably happen to the model during filming), and now I'm working on the decals. Obviously, this plane requires custom decals, but I was not at all happy with how the inkjet decals I printed worked out. Despite clear coating the sheet, they wrinkled and ran when hit with the water/microset. And the decal film looks bad on the aluminum. So I am attacking the problem by commissioning some Alps-printed stuff for the custom markings and using as many dry transfer generic markings as I can find. Hopefully that will give me an acceptable result.

Hopefully, I'll have some more photos to post in a few weeks.

_________________
What is red, furry and on your six?
Image


Top
 Profile  
 
PostPosted: Tue Apr 01, 2014 10:14 am 
Offline
User avatar

Joined: Sun Aug 06, 2006 7:14 pm
Posts: 466
Location: Cincinnati, OH, USA
As promised, here's an update, and something you don't see every day: twin Twin Mustangs.

Image

I received my decals, which turned out to be a good news, bad news thing. The bad news is that when you order from websites written in Japanese, you can never really be sure what you are getting. What I had hoped were going to be dry transfer decals turned out to be waterslide decals, instead. The good news is that they were very, very good waterslide decals, so they looked much better than the kit decals I had tried. I also used a few custom decals printed by Fireball Modelworks, which turned out nicely. Between the two, I got some markings I could live with. The final step was to airbrush the exhaust smoke. The Tamiya paint does not adhere very well to the foil, so the smoke is fragile, and you can see where I boogered it up a bit on one of the planes. Fortunately, it just looks like weathering.

Fritz's nose proved a bit too long for the front canopy, so I had to decapitate him and reorient his head a bit. I also had one canopy break during assembly, so I had to build another one. Fortunately, I had a spare kit,which will be used prior to filming as a stunt double, to test the set-up before crashing one of the models, so I swiped a new canopy from it. I found the micro foil glue not quite strong enough to hold the front canopies in place, so I tacked them down with a couple drops of CA glue. Fortunately, no crazing.

The props look a little wonky, because they tend to work loose from the motor shaft when I test them. I wouldn't want to fly this thing in real life! But they can be easily pushed back into place, and they only need to hang tough for about eight seconds...then the whole model can fly apart, for all I care. It might even look better!

I still need to assemble the center section, which will contain the battery, glue the tubes for the guide wires under the wings, and add Fritz's copilot, but they are very nearly done! Once they are, I'll try to post some better photos...

_________________
What is red, furry and on your six?
Image


Top
 Profile  
 
PostPosted: Sun Apr 06, 2014 10:07 am 
Offline
User avatar

Joined: Sun Aug 06, 2006 7:14 pm
Posts: 466
Location: Cincinnati, OH, USA
Doing a run-up...

Image

_________________
What is red, furry and on your six?
Image


Top
 Profile  
 
PostPosted: Fri Apr 11, 2014 6:28 pm 
Offline
User avatar

Joined: Sun Aug 06, 2006 7:14 pm
Posts: 466
Location: Cincinnati, OH, USA
One reason you don't see too many shiny metal spaceships in older movies is because the reflective properties of the aluminum can be a nightmare when shooting in front of a blue or green screen. Here's a chromakey test I threw together today. You can see that there are some spill problems. The stand is too much in shadow, and causes some reflection headaches, as well. Fortunately, the stand will be a non-issue for the real shoot, since the plane will be on a wire. The first photo is undoctored. The second one is how it appeared in the editor with the chroma key applied and generic sky background placed behind it. The final photo is after some cleanup in Photoshop. For the actual shoot, I'd like to avoid that last step, since I'd have to do it to every frame of the shot.

Image

Image

Image

_________________
What is red, furry and on your six?
Image


Top
 Profile  
 
PostPosted: Mon Apr 14, 2014 8:42 am 
Offline
User avatar

Joined: Tue Jul 31, 2007 12:12 am
Posts: 901
Location: Just outside of Grosse Ile N.A.S.
Looks good, you have a wide variety of talents.


Top
 Profile  
 
Display posts from previous:  Sort by  
Post new topic Reply to topic  [ 7 posts ] 

All times are UTC - 5 hours


Who is online

Users browsing this forum: No registered users and 17 guests


You cannot post new topics in this forum
You cannot reply to topics in this forum
You cannot edit your posts in this forum
You cannot delete your posts in this forum
You cannot post attachments in this forum

Search for:
Jump to:  
Powered by phpBB® Forum Software © phpBB Group