Warbird Information Exchange

DISCLAIMER: The views expressed on this site are the responsibility of the poster and do not reflect the views of the management.
It is currently Wed Jun 18, 2025 6:28 pm

All times are UTC - 5 hours


Classic Wings Magazine WWII Naval Aviation Research Pacific Luftwaffe Resource Center
When Hollywood Ruled The Skies - Volumes 1 through 4 by Bruce Oriss


Post new topic Reply to topic  [ 255 posts ]  Go to page Previous  1 ... 7, 8, 9, 10, 11, 12, 13 ... 17  Next
Author Message
PostPosted: Thu May 27, 2010 1:56 pm 
Offline
1000+ Posts!
1000+ Posts!
User avatar

Joined: Wed Sep 12, 2007 5:27 am
Posts: 1531
Location: Serbia
She is so cute :P

_________________
Owner: http://www.letletlet-warplanes.com
Owner: http://www.letletlet-warplanes.com/forum
Owner: http://www.sreckobradic.com
Email: srecko.warplane@gmail.com
Skype: sreckobradic
Facebook http://www.facebook.com/pages/LetLetLet ... 8234397758


Top
 Profile  
 
PostPosted: Tue Oct 05, 2010 11:14 am 
Offline
Account Suspended
User avatar

Joined: Wed Nov 14, 2007 3:06 pm
Posts: 2713
http://www.acepilots.com/ww2/color-pics/color-yb17.jpg

http://www.acepilots.com/ww2/color-pics ... -bombs.jpg

A couple of cool early YB-17 shots.

I have never seen these before.

Best,

Smiz

_________________
S.


Top
 Profile  
 
PostPosted: Wed Oct 06, 2010 9:13 am 
Offline
3000+ Post Club
3000+ Post Club
User avatar

Joined: Thu Sep 28, 2006 12:56 pm
Posts: 3442
Location: North of Texas, South of Kansas
I like the O.D. scheme on the YBs. I gave some thought to camouflaging the model in this scheme but then it would be just another shark fin B-17 if I displayed it anywhere. I also like the B-18 and A-20 in the background!

S


Top
 Profile  
 
PostPosted: Thu Oct 07, 2010 9:41 am 
Offline
Account Suspended
User avatar

Joined: Wed Nov 14, 2007 3:06 pm
Posts: 2713
Image

I know this is not your YB-17.., but GOLLY, what a beautiful shot of the detail and connections of these aircraft from this era!!!

_________________
S.


Top
 Profile  
 
PostPosted: Thu Oct 07, 2010 12:29 pm 
Offline
3000+ Post Club
3000+ Post Club
User avatar

Joined: Thu Sep 28, 2006 12:56 pm
Posts: 3442
Location: North of Texas, South of Kansas
I love that photo.

Even though the B-18 may not have been the finest war machine of all time, notice the workmanship that the Douglas employees put into that nose section. The riveting and sheet metal finishing is just great.

On an unrelated subject, I'm almost ashamed of that picture of Mickey further up the page :oops: . She's been put on a "doggie-diet" since then and is back down to a little less than 75 pounds. She was tipping the scales at around 84 when that picture was taken........ :drinkers:

Scott


Top
 Profile  
 
PostPosted: Thu Oct 07, 2010 12:41 pm 
Offline
Account Suspended
User avatar

Joined: Wed Nov 14, 2007 3:06 pm
Posts: 2713
MICKEY!!!

LOL!

You live and breath by that DARN B-17 of yours!!!!!

Cheers,

Smiz

_________________
S.


Top
 Profile  
 
PostPosted: Thu Oct 07, 2010 6:00 pm 
Offline
User avatar

Joined: Sun Jun 07, 2009 1:13 pm
Posts: 671
Location: Indiana
Any updates on the model, Scott?

_________________
Image


Top
 Profile  
 
PostPosted: Fri Oct 08, 2010 12:51 am 
Offline
3000+ Post Club
3000+ Post Club
User avatar

Joined: Thu Sep 28, 2006 12:56 pm
Posts: 3442
Location: North of Texas, South of Kansas
Nope, at least not yet. The grass is almost done growing and the hummingbirds have migrated south for the year. Hopefully I'll get to start working on the model again fairly soon. I may re-do the nacelle interior I destroyed and then move on to the aft fuselage as my next part of the project.

Scott


Top
 Profile  
 
PostPosted: Fri Oct 08, 2010 11:45 am 
Offline
User avatar

Joined: Sun Jun 07, 2009 1:13 pm
Posts: 671
Location: Indiana
Looking forward to it!

_________________
Image


Top
 Profile  
 
PostPosted: Thu Nov 11, 2010 1:14 pm 
Offline
3000+ Post Club
3000+ Post Club
User avatar

Joined: Thu Sep 28, 2006 12:56 pm
Posts: 3442
Location: North of Texas, South of Kansas
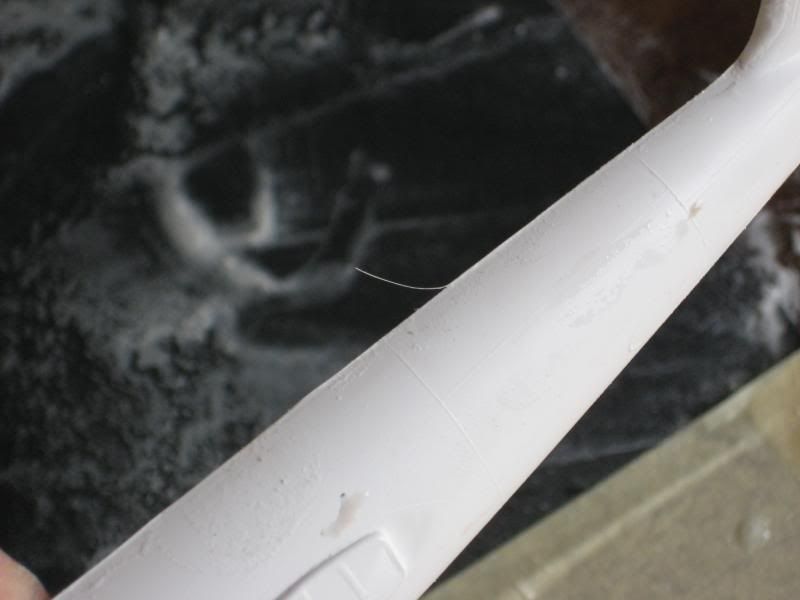
It's raining today so I did a little sanding. Here's a photo of the left fuselage half after removing most of the flash. You can see a little pigtail of material on the edge, a sign that you're just about at the correct sanding depth. From this point on you have to use a very light and even pressure on the part so as not to go too far:
Image

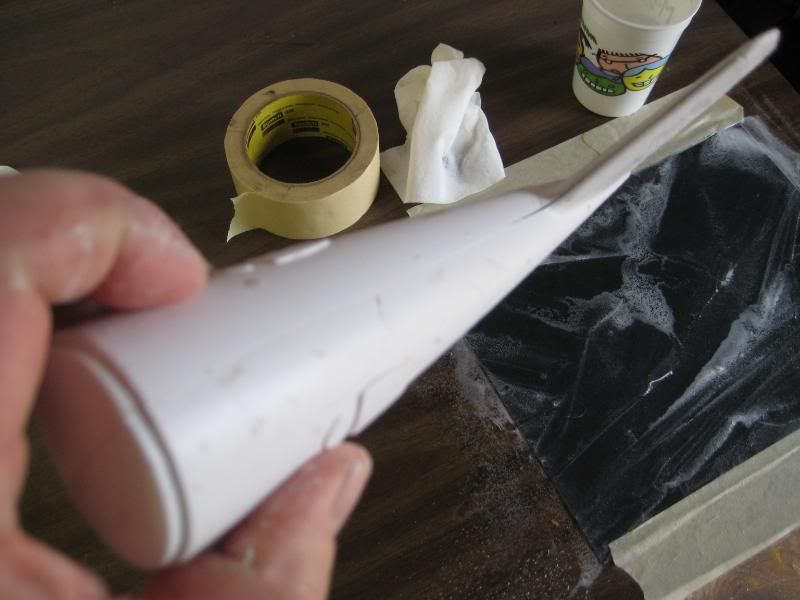
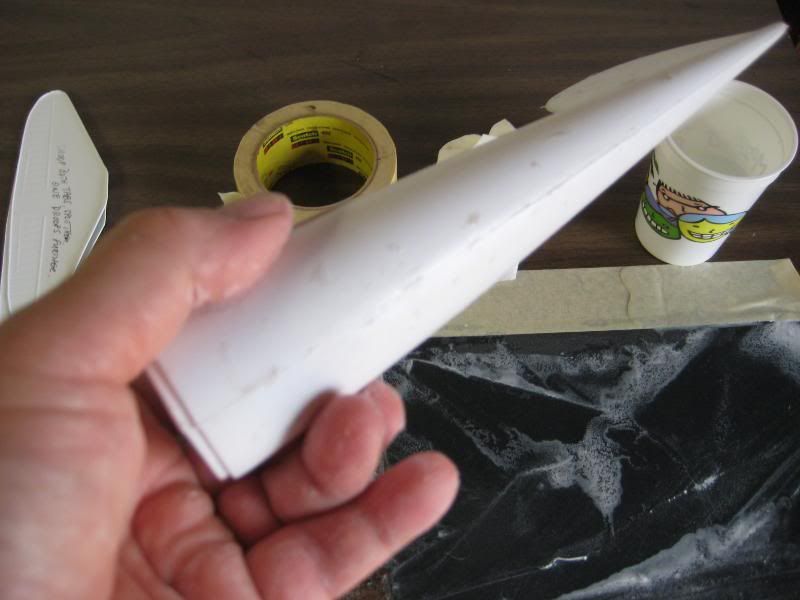
A couple of shots of test-fitting of the two halves after sanding. Notice that there is a tiny bit of a gap at the vertical fin/fuselage juncture--I still needed to touch up the top of the vertical fin to finish this part of the process. On larger parts it is sometimes difficult to uniformly sand all the surface at one time because vacuform pieces are usually a little bit more flexible than their styrene molded cousins.

Image
Image

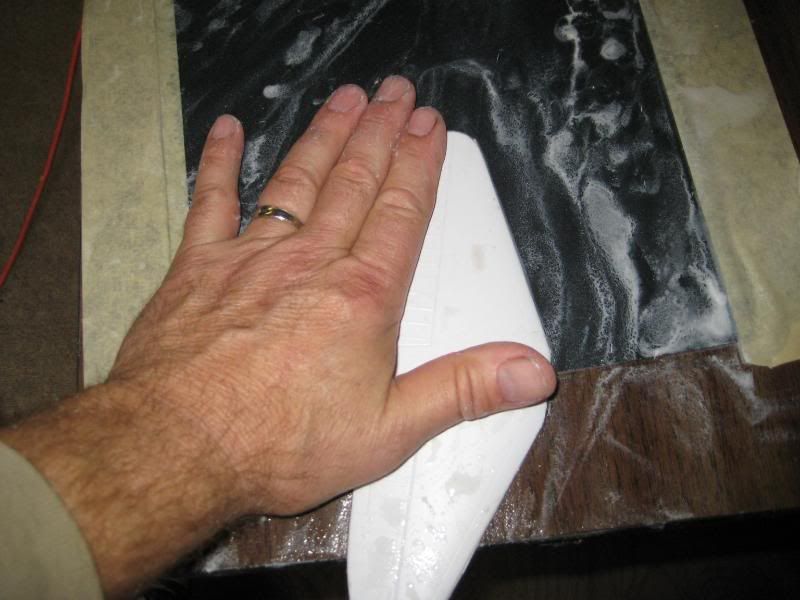
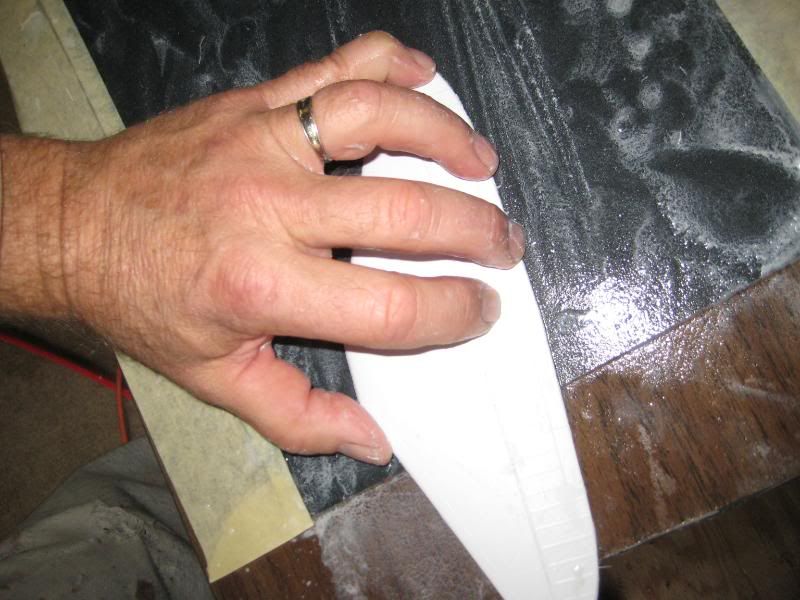
The same process, this time on the horizontal stabilizer halves. I usually start by sanding the entire half as a unit, keeping it on the sandpaper with even pressure (providing that the part doesn't have dihedral, of course).

Image

After getting through the flash it's time to fine tune the process. For this part I sand only the left and right halves of each piece individually so as to get a uniform leading and trailing edge thickness.

Image
Image

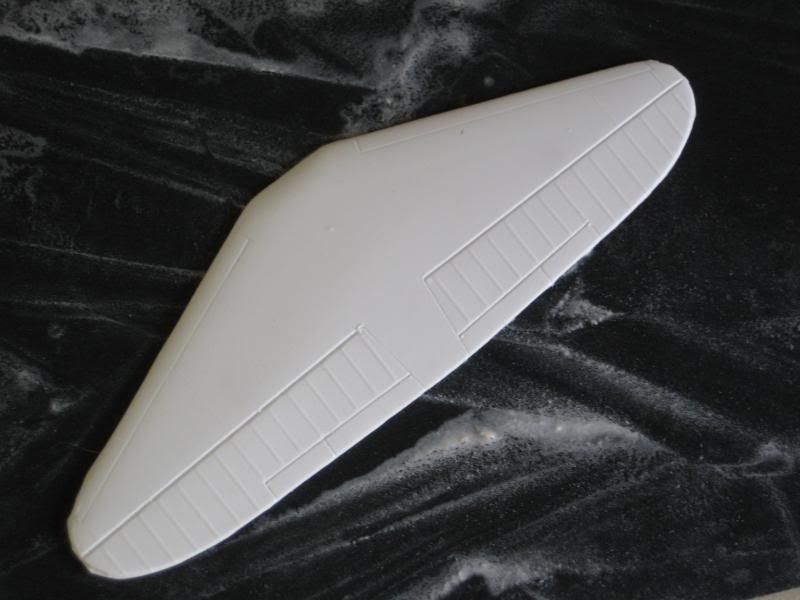
And here are the two halves after sanding and finessing.

Image
Image

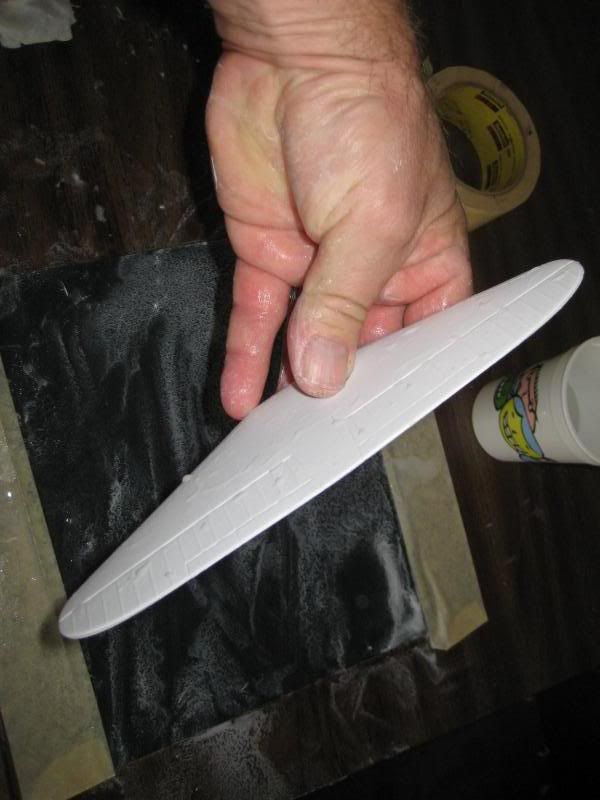
You can see from the last photo that the trailing edge is still a bit thick. With careful sanding you can achieve a knife-edge on most vacuform surfaces, especially on a Koster kit. In this case I'm going to be cutting the elevators and trim tabs loose from the stabilizer later and I'll finish the thinning of the trailing edges then.

More later,
Scott


Top
 Profile  
 
PostPosted: Fri Nov 12, 2010 12:22 pm 
Offline
3000+ Post Club
3000+ Post Club
User avatar

Joined: Thu Sep 28, 2006 12:56 pm
Posts: 3442
Location: North of Texas, South of Kansas
I followed the tip that Steve posted about outlining cutouts with a Sharpie and it is a good guide for trimming, indeed. On a Koster kit there is a nice outline molded into the parts such as where the horizontal goes through the aft fuselage. I simply ran the marker around the perimeter of the molded-in guide marks in this instance.
Image

I should mention for those who haven't done much vacuform modeling that you have to be careful when cutting holes into the fuselage halves for wings and stabilizers. Study the particular kit you're building to make sure that the left and right halves agree with one another. I once built a Wyvern that was molded with the left wing opening 1/4" further aft than the right. If I hadn't done some measuring first I would have made a mess of it. Today's kits, and especially the products I've gotten from Koster, are very accurately molded but some of the old vacuforms weren't quite so precise. It makes building vacuform all the more satisfying when you are able to build a poorer quality kit into a presentable model, but it can also be exasperating to make cuts that don't line up. Measure twice, cut once!

Here's the stab cutout during trimming. Lots of filing and test fitting, but the process isn't anything difficult.
Image

After making both cutouts I slid the horizontal into the fuselage. Notice that it isn't 100% perpendicular to the vertical in this photo. A tiny bit of tweaking will make this come into line. I'll probably build a little fixture so that I get it just right.
Image

Just because I could, I assembled the sections together for the first time to get a feel for how the airplane will look someday. I haven't built a 1/48th B-17 for twenty years---darn it's big!!!!
Image

Image

Scott


Top
 Profile  
 
PostPosted: Fri Nov 12, 2010 3:00 pm 
Offline
Account Suspended
User avatar

Joined: Wed Nov 14, 2007 3:06 pm
Posts: 2713
Awesome 'tail' there Scott, my lad!

Now, for 'foiling' vacuform? How does that work? Is the vacuform too thin to correctly burnish the aluminium?

Side Note:

Have you decided on the paint scheme? Is she going to be a full blown YB-17 or a B-17A?
The 2nd one down is my favorite!
Image

Here is a B&W of her flying.
Image

_________________
S.


Top
 Profile  
 
PostPosted: Fri Nov 12, 2010 7:31 pm 
Offline
User avatar

Joined: Sun Jun 07, 2009 1:13 pm
Posts: 671
Location: Indiana
Lookin' good Scott!

_________________
Image


Top
 Profile  
 
PostPosted: Sat Nov 20, 2010 10:41 pm 
Offline
3000+ Post Club
3000+ Post Club
User avatar

Joined: Thu Sep 28, 2006 12:56 pm
Posts: 3442
Location: North of Texas, South of Kansas
This evening I tackled the problem of making the gun blisters. I first got out the calculator and calipers, figured the size of each emplacement in 1/1 and copied Mgawa's profile view of the lower blister, scaling it to 1/48. Here's some of my math project and the final size of the lower blister:
Image

I then laid the drawing up against the fuselage to get an idea of the dimensions before committing to making parts:
Image

I used clay to make the mold for the first master part. If I'm not happy with the effort it'll be easy to make a new mold:
Image

The first male die just after being popped out of the mold. Now I will start the shaping and fitting process, and once I'm happy with the result, I can use this piece of resin as my male die to vacuform the clear parts. If I make a mistake, I can always pour as many more pieces as needed to get the four enclosures.
Image

Scott


Top
 Profile  
 
PostPosted: Thu Nov 25, 2010 1:28 pm 
Offline
1000+ Posts!
1000+ Posts!
User avatar

Joined: Wed Sep 12, 2007 5:27 am
Posts: 1531
Location: Serbia
Is it Squadron Clear Thermaform still available?

_________________
Owner: http://www.letletlet-warplanes.com
Owner: http://www.letletlet-warplanes.com/forum
Owner: http://www.sreckobradic.com
Email: srecko.warplane@gmail.com
Skype: sreckobradic
Facebook http://www.facebook.com/pages/LetLetLet ... 8234397758


Top
 Profile  
 
Display posts from previous:  Sort by  
Post new topic Reply to topic  [ 255 posts ]  Go to page Previous  1 ... 7, 8, 9, 10, 11, 12, 13 ... 17  Next

All times are UTC - 5 hours


Who is online

Users browsing this forum: No registered users and 2 guests


You cannot post new topics in this forum
You cannot reply to topics in this forum
You cannot edit your posts in this forum
You cannot delete your posts in this forum
You cannot post attachments in this forum

Search for:
Jump to:  
Powered by phpBB® Forum Software © phpBB Group