A place where restoration project-type threads can go to avoid falling off the main page in the WIX hangar. Feel free to start threads on Restoration projects and/or warbird maintenance here. Named in memoriam for Gary Austin, a good friend of the site and known as RetroAviation here. He will be sorely missed.
Tue Mar 01, 2011 1:46 am
The Inspector wrote:Dan,
If you're low on snow, I've got the sloppy, slushy remains of 16 inches of 'Winters bliss' laying around here I'd be glad to send to you FOB.

Thanks, but we've got plenty. I'm just having a scotch now after five hours of plowing and blowing at the airport! At least I can drive up to my hangar again!
Wed Mar 02, 2011 12:56 am
Dan Jones wrote:bdk wrote:I'll bet they riveted a hollow tube, then put it in a press to form it down to the proper shape over a mandrel. I'm guessing the trailing edge was formed last.
Drove the rivets first and then gave up the clearance when they formed the tab? Interesting idea, but one h--- of a pile of work!
Might take a bit of tooling at that, but I'll bet that Boeing built a lot of tabs so the cost would easily get amortized out. I have no real evidence for what I said, but you can afford to think out of the box when you don't know what you're talking about!
Next question- how did Lockheed buck the rivets inside their corrugated early P-38 wing skins? They had corugated panels with flat skins riveted on either side.
Wed Mar 02, 2011 1:27 am
I'd have to see a picture of a P-38 wing's structure before I could even imagine what they were up against, but there was some pretty bright guys back then designing that stuff.
The tool I'm making for that tab I think is going to be very simple but not what you would use for production. For the three or four I'll make I expect that it'll work out fine but I'd love to know what Boeing actually used. I do know that Consolidated employed midgets for bucking rivets in some of the PBY's structure. I remember I was happy camper the day I could no longer fit down the inside of a Twin Otter float to buck!
Wed Mar 02, 2011 10:07 am
Keep taking those 'anti fuel cell pills' (SNICKERS, Baby Ruth)worked for me-
Wed Mar 02, 2011 10:16 am
Not being 19 anymore and drinking beer helped!
Wed Mar 02, 2011 12:50 pm
You can't just buy one of these from one of the usual suspects? If you were working on the sole remaining B-32 I could understand, but there must be plenty of these out there for a Stearman. Of course I do understand the need to do something yourself sometimes, no matter how ill advised.
Wed Mar 02, 2011 3:17 pm
bdk wrote:You can't just buy one of these from one of the usual suspects? If you were working on the sole remaining B-32 I could understand, but there must be plenty of these out there for a Stearman. Of course I do understand the need to do something yourself sometimes, no matter how ill advised.

Well, I have a Stearman to fly (and rebuild later on). This one I'm building up for myself, and since I fly for a living I get my fun from the actual "work" of bringing what I have back to life. Some stuff you do have to buy (got any front interplane struts?) but the challenge of figuring out how to do something like this is just fun in itself. And satisfying.
Dan
Wed Mar 02, 2011 5:37 pm
Absolutely correct Dan,
I much more appreciate talking to a guy @ an airshow or Hot Rod Show who can tell me, in detail how he figured out how to create and install a particular whatever or how he didn't like what was avaiable and innovated a new......,than listen to some guy with a really nice Rod who reeks of '1-800-dial a rod' and 'builds his car' with a VISA card but only knows the absolute basics about his pride and joy 'well, it's red, and has a 350 Chevy engine, and...........'
Wed Mar 02, 2011 10:02 pm
Doing things "the hard way" (for lack of a better term) bites you in the ass once in awhile, but having a sense of humour helps. I designed and started building a mount for a fuel shut-off valve once for a later type of valve (original Stearman fuel valves are famous for leaking - especially seventy years down the road). It would have worked great - except that had it ever become necessary to remove the valve from the airplane you would have had to first pull the engine and mount and then slide the firewall forward about an inch!!

Fortunately I figured that out before having to find out away from base somewhere, standing in a puddle of gasoline!
Thu Mar 03, 2011 1:16 pm
Dan Jones wrote:Some stuff you do have to buy (got any front interplane struts?) but the challenge of figuring out how to do something like this is just fun in itself. And satisfying.

Dan
I fully understand self-abuse (in the aircraft sense).
Thu Mar 03, 2011 1:42 pm
You go to Home Depot and buy what is called"Pop Rivets" it was good enough for Mr.robert diemert(along with duct tape and bailing wire) are you too picky?
Fri Mar 04, 2011 11:54 am
Please post updates on your progress.
That looks about the same as a T-6 tab and I have built a couple of them with some success, but was never happy with the bucking method.
As far as your fuel valve, I think the Sterman uses the same as the T-6 and Andair now has a new ball valve direct replacement. No more cork cone problems.
chip
Fri Mar 04, 2011 2:06 pm
A Stearman only has one fuel tank- how could it use the same fuel valve as a T-6?
Fri Mar 04, 2011 4:24 pm

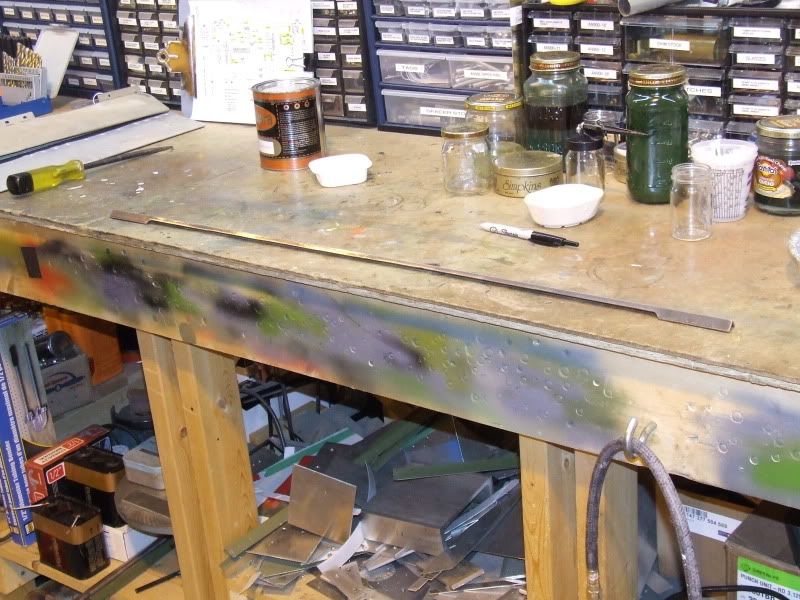
This was the beginning of my idea, a 1/2" square, L shaped piece of steel with one side taken down to 1/4", but it's not working out. It's too long (36") and not rigid enough anymore with that 1/4" taken out to make it fit inside the tab (the 1/2" "ears" for clamping in the vices fit through the tab at a forty five degree angle). The side you see in the picture would be the vertical portion of the tool and the other side would be polished to drive the rivets against. You could buck the 1/8" rivets at the ends of the tabs with it, but it wouldn't do much of a job on the middle ones. I've had to go back up to work but as soon as I get home I'm going to cut down a 1/2" square tube so it'll have two webs instead of one, and it'll be shortened up some, though I'm not certain just how long it's going to have to be. Alternately reversing it in the tab might allow you to shorten it more which would help keep it rigid (effectively giving you a mirror image without lengthening the bar). And instead of milling out slots for the clecos I'm going to try to use just separate pairs of holes (3/16" diameter for 1/8" fasteners, for example) for the cleco stubs to drop into as the rivet is being driven, but I want to keep the number of holes to a minimum so again it doesn't lose any more strength than it has to. Driving back and forth from the airport I've been looking for someone with a wrought iron fence with straight, two foot long, 1/4" verticals, but they don't seem to be much in vogue anymore!

Maybe at the park...
As for the fuel valve, while digging through a box of junk in the hangar one day looking for something else, I discovered a Parker Appliance Company, all steel ball valve, complete with an RCAF overhaul tag on it! It's a simple on-off valve, oriented exactly like an original D-3 valve, and it flow tested at at least thirty-eight gallons/hour. It's an aircraft fuel valve and a really nice one, absolutely perfect inside and out, but I don't know what it's off of originally.
Dan
Fri Mar 04, 2011 11:50 pm
Wrought iron is pretty soft stuff, it might work in this 'one time' application, try cruisin' the backside of the MOTEL 6 with a pair of red handled 'extra keys' or, do you have a metals dealer in the area? see if he'll let you dig in his scraps skid tub for something that would work better than soft iron. If you find something, give him $5 and he'll remember you next time.
Powered by phpBB © phpBB Group.
phpBB Mobile / SEO by Artodia.