Warbird Kid...that's cool that you're builiding a model of this airplane. Make sure you post pictures of the finished product.
Okay, so here's the update...
Nothing too earth shattering, but we've gotten a small amount done in the past few days. Eric, Lance, and Bill, of the High Sky Wing, are working as hard as they can to get those elevators and rudders ready for me to install before the unveiling this coming weekend, so they're feeling the pressure. I had only two volunteers who stayed all weekend, along with Daniel, who got here yesterday and will leave today. James West and a coworker of his came out on Saturday to help out a bit. The primary work being done right now is with fabricating and installing floorboards. These have been, without a doubt, much more difficult than I'd hoped for. They're requiring a lot of extra bracing and such than expected, since I'm having to make many of them hinged in order to allow for PX stuff underneath them. If it weren't for the PX stuff, the floors would be pretty straight forward. But it is what it is.
I finally finished the last of the National insignias on the airplane. Someone had asked recently if I could take y'all through that process, so here it is......
Step one was to cheat. I drilled a #40 hole in the side of the fuselage skin. This is going to be my center point for the insignia, which I had previously made the measurements for in order to obtain it's proper location........

Next, I grabbed my yard stick that I had drilled some holes in. These holes were made to assist me in laying out the exact size and shape of the circle(s). For example, the first hole is a #40 (to match the one in the fuselage), and was placed at the 1" mark on the ruler. Since the Technical Order called out for a 49" inch circle, I drilled a #30 hole at the 25.5 point on the ruler (that's half of the diameter of the 49", but remember, I have to add one inch to the ruler's numbers since my starting point is at 1", not a "zero"). I then clecoed the ruler to the fuselage and placed a pencil in the #30 hole. Then I simply drew a nice, light mark all the way around, to make the circle. Then I just took my fine line tape and masked outside of the line..........


This insignia was a bit of a challenge, due to it's proximity to a gazillion rivets that were going to be included in it. I had to lay the tape around each rivet very carefully, so that the paint wouldn't bleed past it.........


Now that the main circle was outlined with the fine line tape, I needed to mask it off a bit wider to keep overspray from getting to the rest of the fuselage........


The next step I chose to do was to lay out the star. Now, I've painted a bunch of insignias over the years, and none of them seem to be easy, no matter what order you do them in. Some folks prefer to just paint the big, blue circle before laying the star out, but in my time crunch, I couldn't afford to wait for the blue to completely dry, or chance ruining it, by laying out the star on top of it. But the way I'm doing it requires me to mask the star twice, once on the outside, once on the inside. But no matter which way you chose to do it, it's going to take some time.
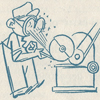
I used this bit of instruction from the Technical Order to lay out the star.....

So the first thing I did to make this happen was to make a vertical and horizontal line, intersecting at the center point of the star. Since the airplane was sitting in a relatively level attitude, I simply got a string, with a washer tied to one end, and used it as a plumb bob to find the vertical line. The horizontal line was simply 90 degrees to that one (difficult to see in these pictures).........


Then, as per the Tech Order, I just divided .59 into the 49" diameter of the circle. That gave me 28.91". I place a piece of tape on this dimension of a string and started making my little "tick" marks along the circle, which is where each leg of the star would intersect. Again, there are other ways to lay out a star, but this is the simplest way to me........


Then you just connect the dots to draw out the star (VERY difficult to see in this photo)........

I was running extremely low on my fine line tape, so I just used some light tack masking tape to lay the star out. I need that fine line stuff for the inner circle later. Anyway, the next step mask off the star, outside of the lines. One thing I did at this point to help me cheat later, was to to ahead and make the measurement from the center of the insignia to the tangent lines of the star. This will give me the radius for the inner circle, which will be layed out later. And naturally, a single line of big, honkin' rivets was right in the middle of one of my tape lines........


Then I scuffed the area to be painted with Scotch Brite and wiped it down with some degreaser (paint prep)........


Then the white paint is applied. Here's the first coat, second coat, and finished result.......


I needed to wait overnight to let that dry, so while I was in the painting mode, I went ahead and shot the Consolidated Green on our new navigator's seat that one of the volunteers prepped for me while I was working on the star.......

Okay, so fast forward to the next morning....
Time to mask off the star and get the blue painted. Pretty straight forward here, so there's no need for lengthy explanation.......


Since the paint for this insignia was actually flattening out and curing like it was supposed to, it allowed me to go ahead and lay out the "meatball" in the center of the star. Naturally, I was careful to stay away from the blue paint, since it had only been shot on a short time before. To lay out the meatball, I used the same method as laying out the outer circle of the insignia. Only this time, I just used a short piece of aluminum, since the yard stick would surely ruin my blue paint when it drug across it. The measurement I made earlier with the tangent lines on the drawing of the star is what I used when drilling the holes for the meatball jig, and the application of the circle was identical to the outer circle.........


The only difference with the masking process here was that I used the tape to create an "air dam" of sorts. This process keeps me from having to place any tape whatsoever on the freshly painted blue paint, and also sort of funnels out any overspray away from the fuselage. Obviously, I use great care when spraying this circle, as I don't want to get outside the masked area. But generally, it works quite well........


While I gave that a few minutes to start the curing process, I touched up the unpainted Cherry rivets in the brown portion of the fuselage, just outside the insignia. Slow and tedious process here.........

But finally, I was able to unmask the meatball and see the finished result. So there you have it, one neatly finished pre-War Insignia........

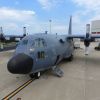
Oh, did I mention that I pulled the airplane out and ran it up yesterday?

(Sorry the pictures are so poor.)


For the run ups, we had to take the covers off of the nose art. It's a shame you weren't here to help us out, or you'd have gotten a sneak peek at it. Heck, I was so nervous about anyone getting an early look at it, that I didn't even take pictures of it.

So on that note, it's time for me to get back to work.
Gary