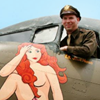
Here's a mini-update with a hand-held shot ...
The sky's done, and I've got the groundwork going at this point. During tonight's session I hope to have most if not all of the rest of the 'hills' on the other side of the main Mustang done. I'm following my pencil study pretty closely as you can tell - the study is attached below for comparison.
For "color" reference, I've got 4 or 5 of my own pics for inspiration. Past that, after the first layers of paint are on the canvas, I tweak as I get the whim, all the time stopping (hopefully) just short of 'overworking' the painting and thus ruining the "painterly" effect. Not easy to know when to cease and desist on a particular area ...
Potential roblems at this point, for example, are things like the prop disc looking WAY out of place, simply because the 'context' of the painting in the form of the aircraft the disc is attached to isn't there yet. Some avoid this trap by "blocking in" everything in one paint layer, but that's just not my style, I've found ... I just refer to the study for 'context' and values, and my ref photos for color notes, correcting later if necessary as the paint dries and allows me to do so.
Things I've already made notes about are I need to glaze-darken the prop blades of the far Mustang; don't think I'll go quite as dark as the pencil study, but definitely darker than I've got here in paint. I prefer to darken with glazes rather than try to lighten with them, so I held off when doing the prop blades darker at this point. As you can see, I like to paint "whatever's in the way" as I go, especially prop blades/discs. That way I'm using the same background paint within the blade/disc. Just works easier for me.
In case you forgot, the canvas is 19" x 42":


Wade